|
|
TableLayout和我们平时在网页上见到的Table有所不同,TableLayout没有边框的,它是由多个TableRow对象组成,<u>每个TableRow可以有0个或多个单元格,每个单元格就是一个View。这些TableRow,单元格不能设置layout_width,宽度默认是fill_parent的,只有高度layout_height可以自定义,默认是wrap_content。</u>
单元格可以为empty,并且通过android:layout_column可以设置index值实现跳开某些单元格。在TableRow之间,添加View,设置layout_height以及背景色,就可以实现一条间隔线。android:layout_span可以设置合并几个单元格:- <? xml version = "1.0" encoding = "utf-8" ?>
- < TableLayout xmlns:android = "http://schemas.android.com/apk/res/android"
- android:layout_width = "fill_parent"
- android:layout_height = "fill_parent" >
- < TableRow >
- < TextView
- android:text = "column1"
- android:padding = "3dip" />
- < TextView
- android:text = "column2"
- android:padding = "3dip" />
- < TextView
- android:text = "column3"
- android:padding = "3dip" />
- </ TableRow >
- < TableRow >
- < TextView
- android:text = "column11"
- android:visibility= "invisible" /> //cell不见了
- < TextView
- android:text = "左边的invisible"
- android:gravity = "right"
- android:padding = "3dip" />
- < Button
- android:id = "@+id/go"
- android:text = "go"
- android:padding = "3dip" />
- < Button
- android:text = "cancel"
- android:padding = "3dip" />
- </ TableRow >
- < View //间隔线
- android:layout_height= "2dip"
- android:background= "#F00" />
- < TableRow >
- < TextView
- android:text = "右边的cell empty" />
- < TextView
- android:layout_column= "2"
- android:text = "跳开empty cell"
- android:padding = "3dip" />
- </ TableRow >
- < TableRow >
- < TextView
- android:text = "合并3个单元格"
- android:layout_span= "3"
- android:gravity = "center_horizontal"
- android:background = "#FFC0C0C0"
- android:textColor = "#f00"
- android:padding = "3dip" />
- </ TableRow >
- </ TableLayout >
|
没有设置收缩/伸展效果
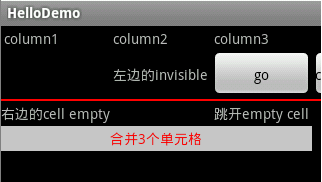
注意,原来没有添加 android:padding="3dip" 的,发现那些column会凑在一起的,没有空白间隔!明显看到,那个cancel按钮被挤到几乎看不见了!这时候需要使用android:shrinkColumns="可收缩的column",android:stretchColumns="可伸展的column"。
<u> android:shrinkColumns和 android:stretchColumns的值都是以0开始的index,但必须是string值,即用"1,2,5"来表示。可以用"*"来表示all columns。而且同一column可以同时设置为shrinkable和stretchable。</u>
如果使用TableLayout类的 setColumnShrinkable/setColumnStretchable (int columnIndex, boolean isShrinkable)就麻烦些了,需要一个一个column来设置。也可以使用TableLayout的 setShrinkAllColumns/setStretchAllColumns来设置all columns。
判断这些column是否shrinkable或stretchable,可以调用 isColumnShrinkable/isColumnStretchable(int columnIndex),isShrinkAllColumns()/isStretchAllColumns()。
- <? xml version = "1.0" encoding = "utf-8" ?>
- < TableLayout xmlns:android = "http://schemas.android.com/apk/res/android"
- android:layout_width = "fill_parent"
- android:layout_height = "fill_parent"
- android:shrinkColumns= "0" > // 设置第一个column可收缩
- < TableRow >
- < TextView
- android:text = "column1"
- android:padding = "3dip" />
- < TextView
- android:text = "column2"
- android:padding = "3dip" />
- < TextView
- android:text = "column3"
- android:padding = "3dip" />
- </ TableRow >
- < TableRow >
- < TextView
- android:text = "column11"
- android:visibility = "invisible" />
- < TextView
- android:text = "左边的invisible"
- android:gravity = "right"
- android:padding = "3dip" />
- < Button
- android:id = "@+id/go2"
- android:text = "go2"
- android:padding = "3dip" />
- < Button
- android:text = "cancel"
- android:padding = "3dip" />
- </ TableRow >
- < View
- android:layout_height = "2dip"
- android:background = "#F00" />
- < TableRow >
- < TextView
- android:text = "右边的cell empty" />
- < TextView
- android:layout_column = "2"
- android:text = "跳开empty cell"
- android:padding = "3dip" />
- < TextView
- android:text = "123456789"
- android:padding = "3dip" />
- </ TableRow >
- </ TableLayout >
|
可收缩column效果
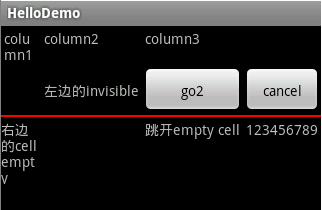
现在可以看到第一个column为了让第4个column完整显示,而收缩得内容分为几行显示!
而 可伸展column的效果就是在其他column可以完整显示时,该column就会伸展,占最多空间:
- <? xml version = "1.0" encoding = "utf-8" ?>
- < TableLayout xmlns:android = "http://schemas.android.com/apk/res/android"
- android:layout_width = "fill_parent"
- android:layout_height = "fill_parent"
- android:stretchColumns= "1 " > // 设置第二个column可伸展
- < TableRow >
- < TextView
- android:text = "column1"
- android:padding = "3dip" />
- < TextView
- android:text = "column2"
- android:gravity = "right"
- android:padding = "3dip" />
- < TextView
- android:text = "column3"
- android:padding = "3dip" />
- </ TableRow >
- < TableRow >
- < TextView
- android:text = "column1"
- android:padding = "3dip" />
- < TextView
- android:text = "column2"
- android:gravity = "right"
- android:padding = "3dip" />
- < TextView
- android:text = "column3"
- android:padding = "3dip" />
- </ TableRow >
- </ TableLayout >
|
可伸展column效果
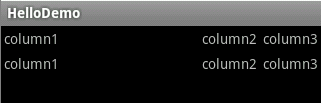
而动态隐藏column,可以调用TableLayout.setColumnCollapsed (int columnIndex, boolean isCollapsed)来指定相应的column。另外TableLayout类的boolean isColumnCollapsed (int columnIndex)能够判断指定的column是否隐藏。
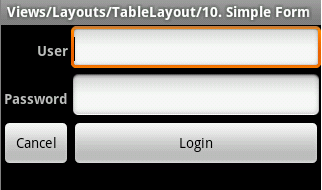
TableLayout可以用来做网页上的Form显示效果,看看官方的sample:
- <? xml version = "1.0" encoding = "utf-8" ?>
- < TableLayout xmlns:android = "http://schemas.android.com/apk/res/android"
- android:layout_width = "fill_parent"
- android:layout_height = "fill_parent"
- android:stretchColumns = "1" >
- < TableRow >
- < TextView
- android:text = "@string/table_layout_10_user"
- android:textStyle = "bold"
- android:gravity = "right"
- android:padding = "3dip" />
- < EditText android:id = "@+id/username"
- android:text = "@string/table_layout_10_username_text"
- android:padding = "3dip"
- android:scrollHorizontally = "true" />
- </ TableRow >
- < TableRow >
- < TextView
- android:text = "@string/table_layout_10_password"
- android:textStyle = "bold"
- android:gravity = "right"
- android:padding = "3dip" />
- < EditText android:id = "@+id/password"
- android:text = "@string/table_layout_10_password_text"
- android:password = "true"
- android:padding = "3dip"
- android:scrollHorizontally = "true" />
- </ TableRow >
- < TableRow
- android:gravity = "right" >
- < Button android:id = "@+id/cancel"
- android:text = "@string/table_layout_10_cancel" />
- < Button android:id = "@+id/login"
- android:text = "@string/table_layout_10_login" />
- </ TableRow >
- </ TableLayout >
|
Form效果
----------------------------
原文链接:https://blog.51cto.com/android/314262
程序猿的技术大观园:www.javathinker.net
[这个贴子最后由 flybird 在 2020-04-18 18:56:51 重新编辑]
|
|


 消息
消息 查看
查看 搜索
搜索 好友
好友 邮件
邮件 复制
复制 引用
引用