|
|
想要制作出拥有多个Tab相互切换的界面,需要用到几个主要的组件:
1. android.app.TabActivity;
2. android.widget.TabHost;
3. android.view.LayoutInflater;
4. android.widget.TabWidget
5. android.widget.FrameLayout
本文描述了制作Tabs界面的三种常用方法,参考来自于Android官方文档及ApiDemo。
在此需要特别说明:android.app.TabActivity;在api13已经被视为废弃组件,官方推荐使用 android.app.Fragment,但是如果为了兼容低版本设备,则可以使用 v4 support library提供的fragment api。
即便如此,预先学习一下旧式的TabActivity,也能更好地学习Fragment。
效果图和示例代码:
1.主界面
activity_main.xml <RelativeLayout xmlns:android="http://schemas.android.com/apk/res/android"
xmlns:tools="http://schemas.android.com/tools"
android:layout_width="match_parent"
android:layout_height="match_parent"
android:paddingBottom="@dimen/activity_vertical_margin"
android:paddingLeft="@dimen/activity_horizontal_margin"
android:paddingRight="@dimen/activity_horizontal_margin"
android:paddingTop="@dimen/activity_vertical_margin"
tools:context=".MainActivity" >
<ListView
android:id="@+id/lstv_demos"
android:layout_width="match_parent"
android:layout_height="match_parent" />
</RelativeLayout> |
MainActivity.java
package com.panny.tabsdemo;
import android.os.Bundle;
import android.app.Activity;
import android.content.Intent;
import android.view.View;
import android.view.Window;
import android.view.WindowManager;
import android.widget.AdapterView;
import android.widget.ArrayAdapter;
import android.widget.ListView;
public class MainActivity extends Activity {
private ListView lstvDemos;
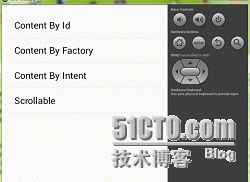
private String[] contents = new String[]{
"Content By Id",
"Content By Factory",
"Content By Intent",
"Scrollable"};
@Override
protected void onCreate(Bundle savedInstanceState) {
super.onCreate(savedInstanceState);
requestWindowFeature(Window.FEATURE_NO_TITLE);
getWindow().setFlags(WindowManager.LayoutParams.FLAG_FULLSCREEN,
WindowManager.LayoutParams.FLAG_FULLSCREEN);
setContentView(R.layout.activity_main);
this.lstvDemos = (ListView) findViewById(R.id.lstv_demos);
ArrayAdapter<String> adapter = new ArrayAdapter<String>(
getCurrentContext(),
android.R.layout.simple_list_item_1,
contents);
this.lstvDemos.setAdapter(adapter);
this.lstvDemos.setOnItemClickListener(new AdapterView.OnItemClickListener() {
@Override
public void onItemClick(AdapterView<?> parent, View view,
int position, long id) {
switch (position) {
case 0:
startActivity(new Intent(getCurrentContext(), ContentByIdActivity.class));
break;
case 1:
startActivity(new Intent(getCurrentContext(), TabByContentFactoryActivity.class));
break;
case 2:
startActivity(new Intent(getCurrentContext(), TabByIntentActivity.class));
break;
case 3:
startActivity(new Intent(getCurrentContext(), ScrollableActivity.class));
break;
default:
break;
}
}
});
}
private MainActivity getCurrentContext() {
return MainActivity.this;
}
} |
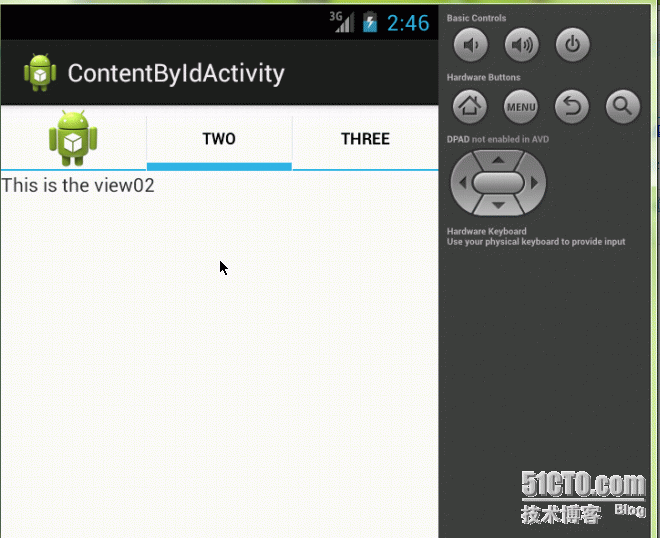
2.Content By Id
ContentByIdActivity.java
package com.panny.tabsdemo;
import android.os.Bundle;
import android.app.TabActivity;
import android.content.Context;
import android.view.LayoutInflater;
import android.widget.TabHost;
public class ContentByIdActivity extends TabActivity {
@Override
protected void onCreate(Bundle savedInstanceState) {
super.onCreate(savedInstanceState);
/*
* TabHost作为标签窗体试图的容器。
* 这个对象包含两个元素,第一个是一个包含了若干个标签名称的集合,用户通过点击它来切换标签视图;
* 第二个是一个帧布局对象,用于显示被选中标签的内容。
* 实际上它们是相互映射,并且相互独立的,但是它们的内容均由TabHost容器控制,而非它们自身。
*/
TabHost tabHost = getTabHost(); // 如果用户没有自定义id为@android:id/tabhost的<TabHost/>,那么将自动从系统获取。
/*
* 首先通过系统服务获取已经在当前上下文挂载并且与设备配置好的LayoutInflater实例
* 这一点必须讲究一下,因为某些文档会直接使用:LayoutInflater.from(this).inflate(...)
* 虽然这并不影响运行效果,但是可能会有部分性能消耗,即使不是很大,但我们也应该注意。
*/
LayoutInflater inflter = (LayoutInflater) this.getSystemService(Context.LAYOUT_INFLATER_SERVICE);
/*
* LayoutInflater的作用是将layout布局文件转换成为View实例,正如第一个参数所为;
* 第二个参数的作用是把tabHost.getTabContentView()得到的FrameLayout实例作为root;
* 第三个参数的作用是将第一个参数的View挂载在root下。
*/
inflter.from(getCurrentContext()).inflate(R.layout.activity_content_by_id, tabHost.getTabContentView(), true);
/*
* TabHost实例负责控制tab增减
* (1)创建一个标签空间,名称为tab01,但它不用于显示, 但它有自己的用处,可参看TabByContentFactoryActivity
* (2)设置标签显示的名称,或许也可以添加一个背景图
* (需要注意的是:在添加背景图使,笔者在emulator-api10 和 emulator-api17上的运行效果不同,emulator-api10可以允许同时添加label和drawable,
* 而emulator-api17需要如此.setIndicator("", getResources().getDrawable(R.drawable.ic_launcher)))
* (3)设置标签对应的内容
*/
tabHost.addTab(
tabHost.newTabSpec("tab01") // (1)
.setIndicator("one", getResources().getDrawable(R.drawable.ic_launcher))// (2)
.setContent(R.id.tv_view01)); // (3)
tabHost.addTab(tabHost.newTabSpec("tab02").setIndicator("two").setContent(R.id.tv_view02));
tabHost.addTab(tabHost.newTabSpec("tab03").setIndicator("three").setContent(R.id.tv_view03));
}
private ContentByIdActivity getCurrentContext() {
return ContentByIdActivity.this;
}
} |
activity_content_by_id.xml
<FrameLayout
xmlns:android="http://schemas.android.com/apk/res/android"
android:layout_width="fill_parent"
android:layout_height="fill_parent">
<TextView
android:id="@+id/tv_view01"
android:layout_width="fill_parent"
android:layout_height="fill_parent"
android:text="This is the view01" />
<TextView
android:id="@+id/tv_view02"
android:layout_width="fill_parent"
android:layout_height="fill_parent"
android:text="This is the view02" />
<TextView
android:id="@+id/tv_view03"
android:layout_width="fill_parent"
android:layout_height="fill_parent"
android:text="This is the view03" />
</FrameLayout> |
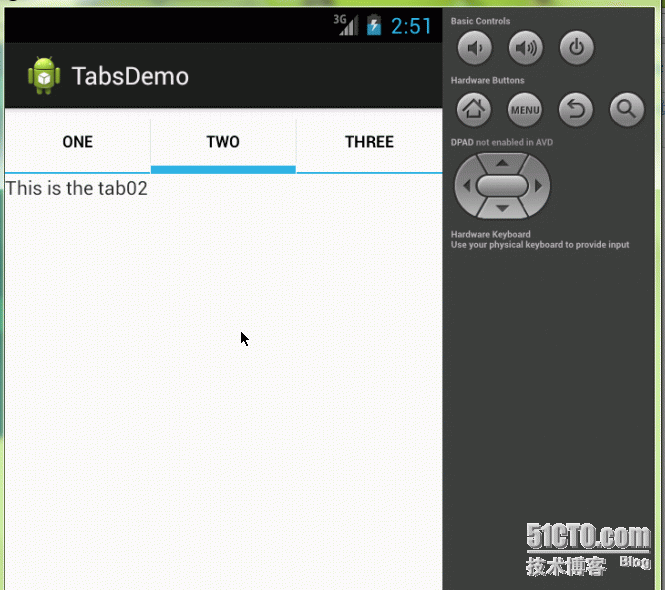
3.Content By Factory
TabByContentFactoryActivity.java
package com.panny.tabsdemo;
import android.app.TabActivity;
import android.os.Bundle;
import android.view.View;
import android.widget.TabHost;
import android.widget.TabHost.TabContentFactory;
import android.widget.TextView;
public class TabByContentFactoryActivity extends TabActivity implements TabContentFactory {
@Override
protected void onCreate(Bundle savedInstanceState) {
super.onCreate(savedInstanceState);
TabHost tabHost = getTabHost();
tabHost.addTab(
tabHost.newTabSpec("tab01")
.setIndicator("one")
.setContent(this));
tabHost.addTab(
tabHost.newTabSpec("tab02")
.setIndicator("two")
.setContent(this));
tabHost.addTab(
tabHost.newTabSpec("tab03")
.setIndicator("three")
.setContent(this));
}
@Override
public View createTabContent(String tag) {
TextView tv = new TextView(this);
tv.setText("This is the " + tag); // 这个参数来自于:tabHost.newTabSpec("tab01")
return tv;
}
} |
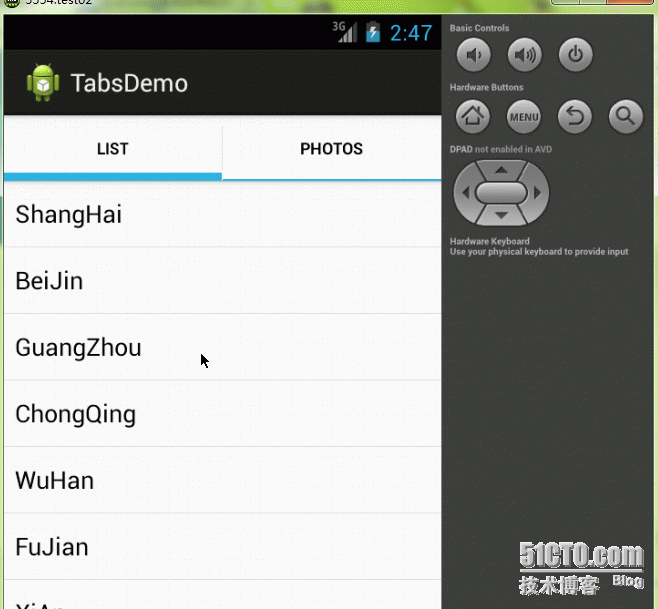
4.Content By Intent
TabByIntentActivity.java
package com.panny.tabsdemo;
import android.app.TabActivity;
import android.content.Intent;
import android.os.Bundle;
import android.widget.TabHost;
public class TabByIntentActivity extends TabActivity {
@Override
protected void onCreate(Bundle savedInstanceState) {
super.onCreate(savedInstanceState);
TabHost tabHost = getTabHost();
tabHost.addTab(
tabHost.newTabSpec("list")
.setIndicator("list")
.setContent(new Intent(this, Cities.class)));
tabHost.addTab(
tabHost.newTabSpec("photos")
.setIndicator("photos")
.setContent(new Intent(this, Phones.class)));
}
} |
Cities.java
package com.panny.tabsdemo;
import android.app.ListActivity;
import android.os.Bundle;
import android.widget.ArrayAdapter;
public class Cities extends ListActivity {
private String[] cities = new String[]{
"ShangHai", "BeiJin", "GuangZhou",
"ChongQing", "WuHan", "FuJian",
"XiAn", "HeiLongJiang", "QingDao"
};
@Override
protected void onCreate(Bundle savedInstanceState) {
super.onCreate(savedInstanceState);
ArrayAdapter<String> adapter = new ArrayAdapter<String>(this, android.R.layout.simple_list_item_1, cities);
getListView().setAdapter(adapter);
}
} |

Phones.java
package com.panny.tabsdemo;
import java.util.ArrayList;
import android.app.ListActivity;
import android.content.Context;
import android.os.Bundle;
import android.view.View;
import android.view.ViewGroup;
import android.view.ViewGroup.LayoutParams;
import android.widget.AbsListView;
import android.widget.BaseAdapter;
import android.widget.Button;
import android.widget.ImageView;
public class Phones extends ListActivity {
private Button btnAdd;
private Button btnClear;
@Override
protected void onCreate(Bundle savedInstanceState) {
super.onCreate(savedInstanceState);
setContentView(R.layout.photos_list);
this.btnAdd = (Button) findViewById(R.id.btn_add_photo);
this.btnClear = (Button) findViewById(R.id.btn_clear_photos);
// 设置当listview为空时,应该显示什么视图,在此显示预先定义的TextView
getListView().setEmptyView(findViewById(R.id.tv_empty));
final PhotoAdapter adapter = new PhotoAdapter(this);
setListAdapter(adapter);
this.btnAdd.setOnClickListener(new View.OnClickListener() {
@Override
public void onClick(View v) {
adapter.add();
}
});
this.btnClear.setOnClickListener(new View.OnClickListener() {
@Override
public void onClick(View v) {
adapter.clear();
}
});
}
private class PhotoAdapter extends BaseAdapter {
private Context mContext;
private int[] photosPool = new int[]{
R.drawable.sample_1, R.drawable.sample_2, R.drawable.sample_3,
R.drawable.sample_4, R.drawable.sample_5, R.drawable.sample_6,
R.drawable.sample_7
};
// 为了动态添加图片,它才是adapter真正的内容提供者
private ArrayList<Integer> photos = new ArrayList<Integer>();
public PhotoAdapter(Context mContext) {
this.mContext = mContext;
}
@Override
public int getCount() {
return photos.size();
}
@Override
public Object getItem(int position) {
return photos.get(position);
}
@Override
public long getItemId(int position) {
return position;
}
@Override
public View getView(int position, View convertView, ViewGroup parent) {
ImageView i = new ImageView(mContext);
i.setImageResource(photos.get(position));
i.setAdjustViewBounds(true);
i.setLayoutParams(new AbsListView.LayoutParams(LayoutParams.WRAP_CONTENT, LayoutParams.WRAP_CONTENT));
i.setBackgroundResource(R.drawable.picture_frame);
return i;
}
private void add() {
int wicthPic = (int) Math.round(Math.random() * (photosPool.length - 1));
photos.add(photosPool[wicthPic]);
notifyDataSetChanged();
}
private void clear() {
photos.clear();
notifyDataSetChanged();
}
} |
}
R.layout.photos_list.xml
<?xml version="1.0" encoding="utf-8"?>
<LinearLayout xmlns:android="http://schemas.android.com/apk/res/android"
android:layout_width="match_parent"
android:layout_height="match_parent"
android:orientation="vertical" >
<LinearLayout
android:layout_width="match_parent"
android:layout_height="wrap_content"
android:orientation="horizontal" >
<Button
android:id="@+id/btn_add_photo"
android:layout_width="0dip"
android:layout_height="wrap_content"
android:layout_weight="1"
android:text="Add Photo"/>
<Button
android:id="@+id/btn_clear_photos"
android:layout_width="0dip"
android:layout_height="wrap_content"
android:layout_weight="1"
android:text="Clear Photos"/>
</LinearLayout>
<!-- The frame layout is here since we will do showing either
the list view or the text view when the list view is empty. -->
<FrameLayout
android:layout_width="match_parent"
android:layout_height="match_parent">
<!-- Here is the list. Since we are using a ListActivity, we
have to identity it as "@android:id/list" so ListActivity will
find it -->
<ListView
android:id="@android:id/list"
android:layout_width="match_parent"
android:layout_height="match_parent"
android:drawSelectorOnTop="false"/>
<!-- Here is the view to show if the list is emtpy -->
<TextView
android:id="@+id/tv_empty"
android:layout_width="match_parent"
android:layout_height="match_parent"
android:text="No photos" />
</FrameLayout>
</LinearLayout> |
4.Scrollable

ScrollableActivity.java
package com.panny.tabsdemo;
import android.app.TabActivity;
import android.os.Bundle;
import android.view.View;
import android.widget.TabHost;
import android.widget.TabHost.TabContentFactory;
import android.widget.TextView;
public class ScrollableActivity extends TabActivity implements TabContentFactory {
@Override
protected void onCreate(Bundle savedInstanceState) {
super.onCreate(savedInstanceState);
setContentView(R.layout.tab_scroll); // 不要忘记加载自定义的布局文件
TabHost tabHost = getTabHost();
for(int i = 0; i < 30; i ++) {
tabHost.addTab(
tabHost.newTabSpec("tab" + i)
.setIndicator("tab_" + i)
.setContent(this));
}
}
@Override
public View createTabContent(String tag) {
TextView tv = new TextView(this);
tv.setText("This is " + tag);
return tv;
}
} |
R.layout.tab_scroll.xml
<?xml version="1.0" encoding="utf-8"?>
<!-- Here is the root and it must be identified as @android:id/tabhost
so that it can be found by getTabHost()-->
<TabHost
xmlns:android="http://schemas.android.com/apk/res/android"
android:layout_width="match_parent"
android:layout_height="match_parent"
android:id="@android:id/tabhost" >
<LinearLayout
android:layout_width="match_parent"
android:layout_height="wrap_content"
android:orientation="vertical"
android:padding="5dip">
<HorizontalScrollView
android:layout_width="match_parent"
android:layout_height="wrap_content"
android:scrollbars="none">
<!-- Here is the tab label container and it must be identified as @android:id/tabs
so that it can be found by tabhost when addTab() -->
<TabWidget
android:id="@android:id/tabs"
android:layout_width="match_parent"
android:layout_height="wrap_content"
android:gravity="center_horizontal|center_vertical" />
</HorizontalScrollView>
<!-- Here is the tab content container and it must be indentified as @android:id/tabcontent
so that it could be found by tabhost when setContent() -->
<FrameLayout
android:id="@android:id/tabcontent"
android:layout_width="match_parent"
android:layout_height="match_parent"
android:padding="5dip" />
</LinearLayout>
</TabHost>
|
----------------------------
原文链接:https://blog.51cto.com/pannyhjm/1265798
程序猿的技术大观园:www.javathinker.net
[这个贴子最后由 flybird 在 2020-05-29 08:51:24 重新编辑]
|
|


 消息
消息 查看
查看 搜索
搜索 好友
好友 邮件
邮件 复制
复制 引用
引用